HRplus Time Workflow
HRplus Time Workflow Overview
The workflow in HRplus Time refers to the approval of Timesheets and allows you to:
• set up a maximum of ten (10) sequential approval stages (Levels 1 to 10) and a minimum of two (2) (Levels 1 to 2).
• link EACH of these ten (10) individual stages to ONE employee ONLY. Each employee must be a designated Timekeeper.
• Enable/Disable workflows.
• Perform the following actions:
• Move Forward: send timesheet to next sequential Level.
• Move Backward: send timesheet to previous Level. Must be at Level 2 or more.
• Post Record: Only the Timekeeper at the last Level can perform this action. Post Record means final approval of the timesheets.
These actions can also be performed in Batch – enabling the approval and/or posting of a batch of timesheets (by Company, Schedule, Shift etc.).
Schedules, Shifts, Employees in Schedules/Shifts are, of course, pre-requisites that need to be set up before using the Timesheets workflow.
How to use the Workflow in HRplus Time?
|
Before using this module, please ensure that: 1. For each Schedule, employees (timekeepers) to whom timesheets should be routed are identified. 2. Timekeepers are categorized into the various workflow stages of Level 1, Level 2 etc. 3. Timekeepers have the necessary permissions (Schedules, Company Access, etc). The steps to use the Time and Attendance Workflow are as follows: • For the selected Schedule, enable the Workflow – by default, the workflow is disabled. Enable/ Disable Workflow. 2. Set up Approval Levels/Timekeepers. • Set up Approval Levels to a maximum of 10 and a minimum of 2. • Assign each Approval Level to a single Timekeeper. The Timekeeper must have the required permissions for the Schedule, Company etc. Step 1: Set up Approval Levels/Timekeepers 3. Use Workflow • On logon, Timekeepers are able to view the Timesheets for their approval. • Timekeepers at Level 1 can move forward timesheet records. • Timekeepers at Level 2 and up, can move forward/backward timesheet records. • Timekeepers at the final approval Level, can move forward/backward/post timesheet records. • Timesheets, once moved forward/backward, will only be displayed to the Timekeeper who has to perform the next approval action. • All Timekeepers can view the workflow history of a timesheet by clicking the Progress button. • Timesheets can be processed individually or in batch via the Batch Workflow Actions button. • Posted Timesheets are checked as Approved and is the final workflow stage. |
Step 1: How to Enable/Disable the Timesheet Workflow
|
|
HRplus Time >> Schedules>>Scheduling>>Schedule>>Schedules>>[expand record]>>Schedule Workflow |
Enable/Disable a Workflow
When a Schedule record is expanded, the Schedule Workflow grid is displayed in red by default. This means that the workflow is disabled (not active) or not set up.
To set up the workflow, you MUST first click the Enable Workflow button to enable or activate the workflow – the grid will automatically change to green.
To disable or deactivate the workflow, click the Disable Workflow button.
You may disable workflows that are already in use – the timesheets, already processed by the workflow, will remain in their current state.
1.1 Enable the Workflow
Click the Enable Workflow button. The colour of the grid will change from red to green.
1.2 View Enabled Workflow
Step 2: How to Set up Approval Levels/ Timekeepers?
|
|
HRplus Time>>Schedules>>Scheduling>>Schedule>>Schedules>>[ expand record]>>Schedule Workflow |
Timekeeper Approval Levels
The second step is to set up the various Timesheet approval levels. You are allowed to set up a maximum of ten (10) Levels (1 to 10) or a minimum of two (2) (Levels 1 to 2). At each Level, select the Timekeeper who has the responsibility to approve the timesheets.
Normally, the Level one (1) or Primary Timekeeper is responsible for the daily timekeeping tasks including but not limited to:
• Clearing unprocessed punches
• Daily posting of the Attendance logs to Timesheets
• Review, editing and approval of timesheet hours
The Level two (2) ( and higher) or Secondary Timekeeper normally reviews the timesheets as a batch or summary, paying attention to any comments and instances of overtime approved for payment.
A Timekeeper can only be selected at ONE level – timekeepers CANNOT be responsible for approving timesheets at MORE THAN ONE level.
N.B. If a timekeeper is on leave and cannot perform their timekeeping tasks, then the Core HRplus Time user must select the name of the Timekeeper who will be acting and performing these timekeeping tasks within the appropriate stage on the workflow. Once the original Timekeeper returns from leave then their name must be re-selected in the workflow.
Pre-requisite Setup Tasks:
• Schedules/Shifts/Employees in Schedules/Shifts MUST already be set up.
• Timekeepers must be setup and have the relevant access to the schedules.
• The admin user MUST have the required permissions to set up the workflow.
2.1 Select the Level and Timekeeper Responsible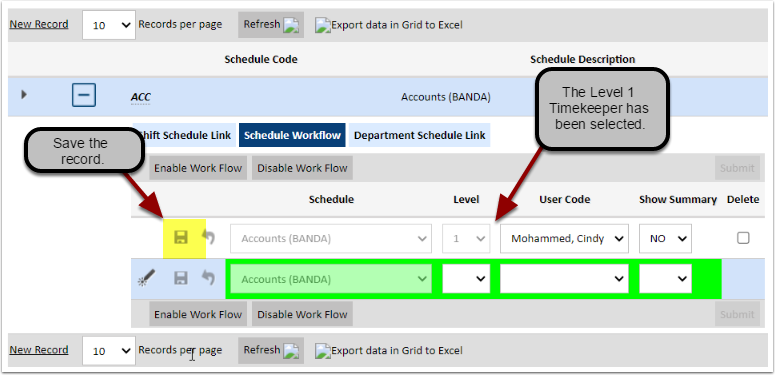
|
Schedule: The Schedule is defaulted to the one that is being configured. Level: The Level drop-down list will display 1 to 10 in numerical order. Select the appropriate number. User Code: The User Code drop-down will display all the Timekeepers set up for the selected Schedule. Select the appropriate name. Show Summary: Select either YES or NO in this field. The default is NO.
When the record is saved, an additional row is generated to add more Timekeeper Levels. Select the appropriate level and user code to setup the different stages of the workflow until all the stages have been configured. |
Using the Timekeeper Workflow
Using the Workflow - Level 1 (Primary Approver)
|
|
User Self Service>>Timekeeper>>Timesheets>>Timesheet>> Current |
Level 1 - Workflow Progress and Actions
Once the workflow is set up and enabled, the Timekeeper at Level 1, upon logon, can view the timesheets for approval. Timekeepers MUST have access to the Company, Department and Schedule and can only view the workflow at each of their designated Levels.
Workflow Actions
For each individual timesheet, you may select the specific Workflow Actions of:
• Move Forward - Timekeepers at Level 1 can ONLY move timesheets forward.
• Move Backward - Timekeepers at Level 1 CANNOT move timesheets backward as there are no previous approval levels to which the timesheets can be sent.
• Post Record: Timekeepers at Level 1 CANNOT post and approve timesheets this MUST be done by the Timekeeper who is at the final Approval Level.
Step 1. View the Timekeeper Timesheet
Step 2. View all Workflow Progress
At Approval Level 1, only this default step will be displayed.
Step 3. View Workflow Actions Displayed in Drop-Down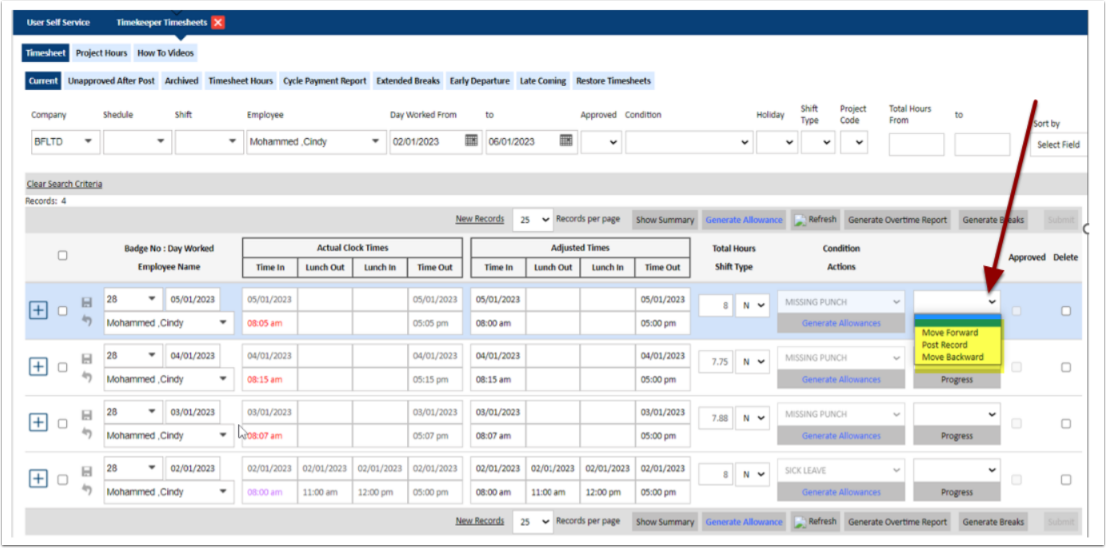
Step 4. Select the Option to Move the Workflow Forward
|
Move Forward: To move forward a timesheet means to approve and send it to the next approval level. Select Move Forward from the drop-down, enter a Comment and click Submit Comment. Click Submit when data entry is complete. The grid will be refreshed or click the Refresh button - the timesheets that have been sent forward will no longer be displayed at this Level. For each Timesheet, repeat the process to move it forward. |
The Timesheet Sent Forward is No Longer Visible
Using the Workflow - Level 2 and Above
|
|
User Self Service>>Timekeeper>>Timesheets>>Timesheet>> Current |
Level 2 and Above - Workflow Progress and Actions
Workflow Progress
Once the workflow is set up and enabled, the Timekeeper at Level 2, on logon, will view the timesheets sent from Level 1 that require approval. Timekeepers MUST have access to the Company and Schedule and can only view the workflow at each of their designated Levels.
Workflow Actions
For each individual timesheet, you may select any of the specific Workflow Actions below:
• Move Forward: Timekeepers at Level 2 can move timesheets forward.
• Move Backward: Timekeepers at Level 2 can move the timesheets backward to the previous approval levels if there is a discrepancy found.
• Post Record: Timekeepers at Level 2 or Higher can post and approve timesheets ONLY if this is the Timekeeper who is at the final Approval Level.
• Batch Actions: This is used to edit
multiple timesheets at the same time
Step 1. View Notification Messages for
Timesheets to be Approved
Step 2. View the Timekeeper Timesheet
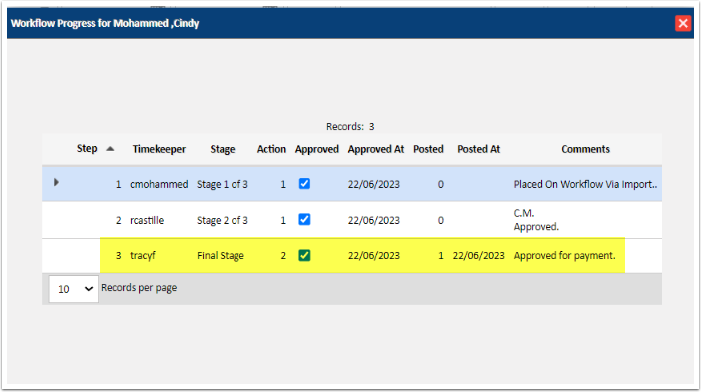
Step 3. View all Workflow Progress
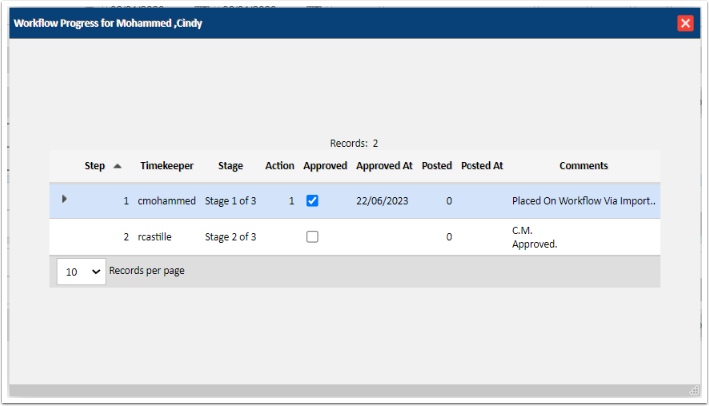
The Workflow Progress will display previous and current workflow Steps and Comments.
Step 4. Option 1 - Move the Timesheet Forward
|
Move Forward: To move forward a timesheet means to approve and send it to the next approval level. Select Move Forward from the drop-down, enter a Comment and click Submit Comment. Click Submit when data entry is complete. The grid will be refreshed or click the Refresh button - the timesheets that have been sent forward will no longer be displayed at this Level. For each Timesheet, repeat the process to move it forward or use the Batch Workflow Actions to edit more than one timesheet. |
Step 5. Option 2 - Move the Timesheet Backward
5.1 The Timesheet Sent Backward is No Longer Visible
|
Move Backward: To move a timesheet backward means to send it back to the previous approval level. This may be in situations where there may be queries to the timesheet/s. Select Move Backward from the drop-down, enter a Comment and click Submit Comment. Click Submit when data entry is complete. The grid will be refreshed or click the Refresh button - the timesheets that have been sent backward will no longer be displayed at this Level. |
5.2 The Previous Timekeeper Sees Notification
for Timesheet Sent Backwards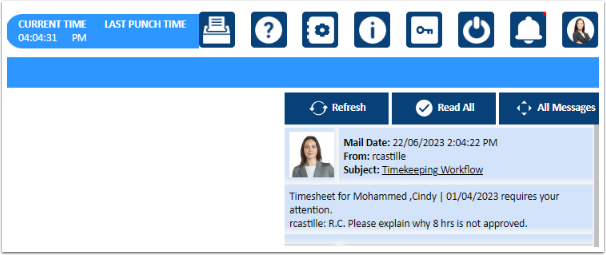
5.3 The Previous Timekeeper Reviews Progress
History of Timesheet Sent Backwards
5.4 The Timesheet is Sent Forward Again with
Comment Explaining Discrepancy
Step 6. Option 3 - Post Timesheet Record
|
Only Timekeepers at the final Approval Level can post records. Click Submit when data entry is complete. |
6.1 View Approved Timesheets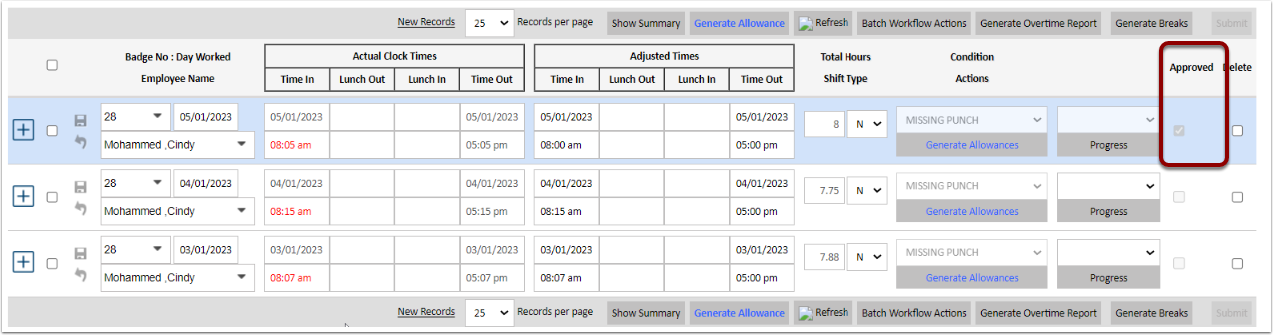
|
Click Submit when data entry is complete. The grid will be refreshed or click the Refresh button - the Approved box will be checked for the Timesheets that have been posted/approved. For each Timesheet, repeat the process to post/approve it or use the Batch Workflow Actions to edit more than one timesheet. |
6.2 The Date the Timesheet was posted will be
reflected in the Workflow Progress
The workflow is complete and the next step
would be for Payroll Personnel to post the Timesheets to the Cycle Changes in
the Payroll module for processing.
How to use
the Batch Workflow Actions?
|
|
User Self Service>>Timekeeper>>Timesheets>>Timesheet>> Current |
Batch Workflow Actions
Timesheets can be
processed indi
vidually or in batch via the Batch
Workflow Actions button.
For each individual timesheet, you may select the specific Workflow Actions of:
• Move Forward
• Move Backward
• Post Record
OR you may wish to minimize data entry by selecting a specific Workflow Action for a batch of
Timesheets. These actions above can also be performed in Batch – enabling the approval and/or posting of a batch of timesheets (by Company, Schedule, Shift etc.) by clicking the Batch Workflow Actions button.
Step 1. Review Timesheets for Batch Action
|
Batch Operations are performed on Timesheets that are currently displayed on the grid. Select the number of timesheets you wish to display from the drop-down list shown above. Review the Timesheets for the Batch Action. If there are any timesheets to be omitted from the batch option you are about to select, then check the box on the respective timesheets as shown above. |
Step 2. Select the Batch Actions to be Performed
|
Action: Select one action from the drop-down list to move the Timesheets in the workflow process either Forward, Backward or Posted/Approved. Exclude Selected: check YES and the box/es next to the record/s that you wish to omit from the Batch operation. Click Submit Batch Operation. |
Step 3. View the Message to Confirm the Batch Action was Successful
Step 4. Refresh Screen to See Batch Records No
Longer Visible
Related Articles
HRplus Time Workflow (Setup)
Setup - HRplus Time Workflow HRplus Time >> Schedules>>Scheduling>>Schedule>>Schedules>>[expand record]>>Schedule Workflow Step 1: How to Enable/Disable the Timesheet Workflow Enable/Disable a Workflow When a Schedule record is expanded, the ...HRplus Time (Setup - Timekeeping Workflow)
Setup - Timekeeping Workflow HRplus Time Workflow Overview The workflow in HRplus Time refers to the approval of Timesheets and allows you to: set up a maximum of ten (10) sequential approval stages (Levels 1 to 10) and a minimum of two (2) (Levels ...HRplus Time Workflow (Introduction and Key Concepts)
Introduction and Key Concepts HRplus Time Workflow Overview The workflow in HRplus Time refers to the approval of Timesheets and allows you to: set up a maximum of ten (10) sequential approval stages (Levels 1 to 10) and a minimum of two (2) ...HRplus Time Workflow (Using the Timekeeper Workflow)
Using the Timekeeper Workflow User Self Service>>Timekeeper>>Timesheets>>Timesheet>> Current Using the Workflow - Level 1 (Primary Approver) Level 1 - Workflow Progress and Actions Once the workflow is set up and enabled, the Timekeeper at Level ...HRplus Time (Setup - Time Constants)
Time and Attendance Updates: What's New? This article provides a summary of recent updates to the HRplus Time and Attendance modules, focusing on key enhancements. These updates include new features, fixes and improvements designed to improve both ...