Benefits
Overview of the Benefits Module
OVERVIEW
The HRplus Benefits Module is designed to streamline the management of employee benefits programs within an organization. It allows employees to easily view, their enrollment in benefits such as health insurance and retirement plans. The module offers customizable benefit plan configurations, generates reports and analytics for data-driven decisions, and provides self-service access for employees to view their benefits. This centralized, automated approach enhances efficiency, accuracy, and employee engagement, simplifying overall benefits administration and improving the employee experience.
A Guide to Using the Benefits Module
Navigate to the Benefits Module:
|
The summary steps to set up the Benefits module are as follows: 1. Set up user defined Benefit Type. 2. Set up user defined Benefit Plans. This includes the name and address of the administrator of the plans. 3. Link your Benefit Plan to my company. 4. Setup user defined Benefit Plan Types by linking the benefit plans to the benefit types. Setting up of Plan types also includes employee and employer contributions. 5. Setup Benefit Enrollment Rules. 6. Setup Benefits-Payroll link where either: 1. A deduction will be processed for all employees in the paygroup when the payroll is run or 2. A deduction will be automatically setup for employees registered in the plan. |
|
Steps |
Description |
|
Step 1 |
Benefits Setup: |
|
|
Benefits>>Benefits>>Benefits Setup>>Benefit Types Benefits>>Benefits>>Benefits Setup>>Benefit Plans Benefits>>Benefits>>Benefits Setup>>Company Benefit Plans Benefits>>Benefits>>Benefits Setup>>Benefit Plan Types Benefits>>Benefits>>Benefits Setup>>Benefit Plan Types>>[Select Plan]>>[+]>>Enrolled Employees Benefits>>Benefits>>Benefits Setup>>Benefit Plan Types>>[Select Plan]>>[+]>>Benefit Enrollment Rules Benefits>>Benefits>>Benefits Setup>>Benefit Plan Types>>[Select Plan]>>[+]>>Benefit Dependents Benefits>>Benefits>>Benefits Setup>>Benefits Payroll Link Benefits>>Benefits>>Benefits Setup>>Benefits Link Other Setup |
|
|
Benefit Types |
Benefit Types categorizes benefit plans available to employees. Benefit Types can be linked to multiple benefit plans, for example: Single Coverage Single Plus One Coverage Family Coverage |
|
|
Benefit Plans |
Benefit Plans are the plans provided to your organization by a provider. Details such as contact info and email address are entered. An unlimited number of unique benefit plans can be added. |
|
|
Company Benefit Plans |
Link your company to all relevant Benefit Plans. |
|
|
Benefit Plan Types |
A Benefit Plan Type links benefit types to a specific Benefit Plan. This linkage categorizes the various benefits available to employees. Each Benefit Plan can have an unlimited number of plan types and plan types are applicable to any benefit plan. |
|
|
Enroll Employees |
Employees can be enrolled in a benefit plan. Employees can be registered for any number of plans. |
|
|
Benefit Enrollment Rules |
Define rules for employees to join the requisite Benefit Plan Types. |
|
|
Benefit Dependents |
Define rules for Benefit Dependents to join the requisite Benefit Plan Types. |
|
|
Benefits Payroll Link |
A benefit plan/plan type can be linked with a deduction code for a particular pay group. A deduction can be automatically set up for employees registered in benefit plans. |
|
|
Benefits Link Other Setup |
This option is for Benefits Payroll Link where Employee Calc On or Employer Calc On is set to OTHER and selecting the payroll codes for benefit calculations. |
|
Step 2 |
Benefits Transactions: |
|
|
Benefits>>Benefits>>Benefits Setup>>Benefit Plan Types>>>>[Select Plan]>>[+]>>Enrolled Employees Benefits>>Benefits>>Beneficiaries>>[Select Employee]>>[+]>>Beneficiaries Benefits>>Benefits>>Coverage>>Employees>>[Select Employee]>>[+] |
|
|
Enroll Employees |
Enroll employees via Benefits Plan Types or Coverage. Employees can be registered for any number of plans. Employees can be linked to only one Primary Health Plan and one Secondary Health Plan. |
|
|
Beneficiaries |
A beneficiary is an individual or entity designated to receive benefits from financial products. |
Glossary of Benefits Terms
B
Beneficiary: The person designated by the employee to receive benefits, such as life insurance payouts, in the event of the employee's death.
Benefit Enrollment Rules: Guidelines dictating the process, time frame, and eligibility requirements for employees to enroll in benefits.
Benefit Join Date: The specific date when an employee becomes eligible to participate in the benefits plan offered by the employer.
Benefit Payroll Rules: Parameters for how benefit-related deductions and contributions are managed within the HRplus payroll module.
Benefit Start Date: The date on which the employee's benefits coverage becomes active and they can start utilizing the benefits. This is also the date when deductions for employee and employer contributions to the plan begin.
Benefit Type: Categorizes benefit plans available to employees, linked to multiple plans (e.g., Single coverage, Family coverage).
Benefits Plan: Defines the specific details and names of the plans provided to your organization by the plan provider, including contact information and email address. An unlimited number of unique benefit plans can be added.
D
Dependent: A person, such as a spouse or child, who is eligible to receive coverage under an employee's benefits plan.
E
Employee Coverage: The scope and level of benefits provided to an employee, including specifics on what is covered and any limitations.
Enroll Employee: The process of registering an
employee into the benefits plan, ensuring their eligibility and proper
documentation.
Benefits Module Updates: What's New?
This article provides a summary of recent updates to the HRplus Benefits module, focusing on key enhancements. These updates include new features, fixes and improvements designed to improve both user experience and the effectiveness of the module.
December 2nd, 2024 - January 3rd, 2025
1. Beneficiaries: New options added to the Relationship field.
August 16th – September 13th, 2024
1. List of Employee Contributions and Sum Assured: New feature for generating reports of employee contributions and assured sums. Read more here.
July 12th – August 16th, 2024
1. Employees: The screen was updated. Read more here.
June 17th – June 26th, 2024
1. Enrolled Employees: Updates to manage and track enrolled employees in benefits programs. Read more here.
May 4th – June 17th, 2024
1. Benefit Links Setup: New options for linking benefits to other setups within the system. Read more here.
December 12th – December 20th, 2023
1. Workflow Leave Entries: Enhanced workflows for managing leave entries linked to benefits. Read more here.
November 4th – December 12th, 2023
1. Health Plan Claims: New features for managing and processing employee health plan claims. Read more here.
October 8th – November 4th, 2023
1. Enrolled Employees: Enhanced tools for enrolling employees in
benefits programs and tracking participation. Read more here.
September 1st – October 8th, 2023
1. Beneficiaries: Added features for managing and registering beneficiaries linked to employee benefits. Read more here.
January 5th – February 6th, 2022
1. Benefits-Payroll Link: Added functionality to link employee benefits with payroll data. Read more here.
September 5th – November 29th, 2021
1. Import Enrolled Employees: New import options for enrolled employees in the benefits module. Read more here.
How to enter a Benefit Type
|
|
Benefits>>Benefit Setup>>Benefit Types OR Payroll >>Business Rules >>Business Rules>>Benefit Types |
Benefit Type
A Benefit Type categories the benefit plans that an organization makes available to their employees. Benefit Types are linked to benefit plans. A benefit type is not specific to one benefit plan and can be linked to more than one benefit plan.
E.g. Single coverage, Single plus one coverage, Family coverage, etc.
Enter a New Benefit Type
Benefit Type Code: Enter a user defined code for the Benefit description.
Benefit Type
Description: Enter a description of the benefit type. e.g. Dental. Save the
record and repeat as required to enter all the different benefit types that are
available within your organisation.
How to Set Up a Benefit Plan
|
|
Benefits>>Benefit Setup>>Benefit Plans OR Payroll >>Business Rules >>Business Rules>>Benefit Plans |
Benefit Plan
A Benefit Plan defines the details or the specific names of the plans provided to your organization by your plan provider. Additional details such as their contact information and email address can also be added.
An unlimited number of
unique benefit plans can be added.
|
Click on New Benefit Plan and enter the basic Plan information. Plan ID : Enter a user defined IF to represent your plan. Plan Name: Enter the name of the plan offered by your organization to the employees. E.g. Sagicor Group Life Plan . Benefit Provider: Enter the name of the company offering the plans to your organization. E.g. Sagicor, Guardian, etc. Address one-Three: Enter the address of the benefit provider in lines one through three. Plan Policy No: Enter the policy numb er assigned to your organization for the respective plan. Web Site: Enter the web site address of the benefit provider. Contact Person: Enter the name of the person who manages your company account at the provider. Email address: Enter the email address for the contact person. Health Plan: A Benefits plan must be flagged as a Health Plan in order for claims to be processed under this plan in the Health Plan module. Flag Yes if the benefit plan is a health plan. Otherwise, flag No. |
|
Secondary Health Plan: Otherwise flag No. Secondary Health Plans offer coverage separate from a regular medical plan. They tend to cover care and services that a primary medical plan may not. This can include a vision plan, dental plan, accidental injury or critical illness plan to name a few. Flag Yes if the benefit plan is a Secondary health plan. Otherwise, flag No. Sum Assured: A sum assured is a fixed amount that is paid to the registered beneficiary of the plan in the unfortunate event of the policyholder's demise. The insurance company pays this money as per the amount chosen by the employee at the time of enrolling in the policy. Flag Yes if the sum assured is required. Otherwise, flag No. Save the record and repeat to enter additional plans. |
How to link my Benefit Plan to my company
|
|
Benefits>>Benefits>>Benefits Setup>>Company Benefit Plans OR Payroll >>Business Rules >>Business Rules>>Company Benefit Plans |
Link the Benefit Plan to your Company
|
• Click on New Record • Select the Company and Benefit Plan from the respective drop-down lists. • Save your entry and the record will be displayed in the list. • Repeat the process to enter additional unique records. |
|
|
N.B. Employees can be enrolled on plans ONLY when that plan is linked to the company. |
How to add a new Benefit Plan Type
|
|
Benefits>>Benefits>>Benefit Setup>>Benefit Plan Types OR Payroll >>Business Rules >>Business Rules>>Benefit Plan Types |
A Benefit Plan
Type allows you to link the benefit type to a benefit plan. This linkage
clearly defines the different types of categories offered to an employee under
that Benefit Plan.
1. A Benefit Plan plan can have unlimited plan types.
2. Plan types can be used for any benefit plan.
|
|
How does it work? Click on New Benefit Plan Type and enter the information as defined below. |
Enter
New Benefit Plan Type
|
Benefit Type Code and Benefit Type Description: Select the Benefit Type from the drop down list. Benefit Plan ID and Benefit Plan Name: Select the Benefit Plan from the drop-down list. Health Plan: The flag here is displayed based on what was selected when creating the Benefit Plan. In this example, the plan was flagged as Yes for Health Plan. The flag cannot be changed from this screen. Percent or Cash: Flag whether the contributions that either the Employee or Employer makes towards the plan is entered in cash or based on a percentage of the employee's earnings. ( The calculation of the percentage of earnings is further defined in the benefits-payroll linkage screen). In this example above, the contributions are made in cash. This flag is set for ALL employees enrolled in the plan. Employee Contribution Amount: If the Employee contributes towards the plan, enter the value amount here as either cash or a percentage, based on the previous flag which was set for the Benefit Plan Type. Allow Edits: If the employee can edit the amount from the self service module, select Yes. Otherwise, select No. Employer Contribution: If the employer is to contribute to the plan, please enter the amount/figure here. |
|
Amount: If the Employer contributes towards the plan, enter the amount here as either cash or percentage base on the previous flag which was set for the Benefit Plan Type. Allow Edits: If the employee can edit the amount from the self service module, select Yes. Otherwise, select No. Sum Insured Amount: This value is typically applied to non-life insurance policies. It is the reimbursement or compensation of an insured loss. Enter the value here taken from the plan policy details. Allow Edits: If the employee can edit the amount from the self service module, select Yes. Otherwise, select No. Termination on: Select one of the choices from the drop-down list to indicate what condition must be satisfied for employees to be terminated from the plan. The options include Retirement, Death, Disability, Severance or Other. If Other, please specify: If ‘Other’ is chosen in the Termination On field, please specify under what conditions the benefit plan is to be terminated. |
How do I enroll an Employee in a Benefit Plan?
|
|
Benefits>>Benefits Setup>>Benefit Plan Types>>[Select the Benefit Plan Type]>>[+]>>Enrolled Employees OR Payroll >>Business Rules >>Business Rules>>Benefit Plan Types>>Expand the plan record>>Enrolled Employees |
Enrolled Employees
Employees can be
enrolled in a benefit plan by following the steps below:
1. Search for the plan the employee is to be enrolled in.
2. Click on the + sign to expand the record.
3. Select New Record and enter the employee details.
4. Save the record and repeat.
N.B. Employees can be registered for any number of plans. NB, however, the employee can be linked to only ONE Primary Health Plan and ONE Secondary Health plan.
Step 1: Search for the Benefit Plan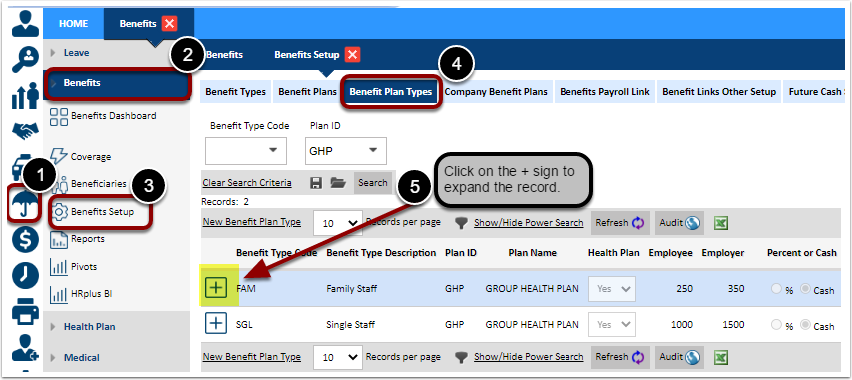
Step 2: Expand the Plan Record
Step 3: Enroll New Employee in the Plan
|
N.B. The Benefit Plan Type MUST be linked to the Company BEFORE employees can be successfully enrolled in the plan. Company Code: Select the Company from the drop-down list. Pay Group: Select the Pay Group from the drop-down list. Pay groups shown will be filtered based on the Company selected. Badge Number, Last Name, First Name: Select the Name or Badge number of the employee from the drop-down list. Names shown will be filtered based on the Pay Group selected. Date Join: Enter the date the employee joined the benefit plan (e.g. the date on the employee’s registration form) Date Start: Enter the effective date the employee became active on the plan. Certificate Number: Enter the registration number of the employee that is obtained from the insurance company upon enrollment in the plan. |
|
Option: This field shows how the contribution is paid. It is either cash or percentage and is set at the Plan level. This field cannot be edited in from this screen and is view ONLY. Employee Contribution: Enter the value of the employee’s contribution to the plan. This can be either cash or a percentage based on what was set up at the plan level. This only needs to be entered at the employee level if the value of the contribution is different for each employee. Employer Contribution: Enter the value of the employer’s contribution to the plan. This can be either cash or a percentage based on what was set up at the plan level. This only needs to be entered at the employee level if the value of the employer's contribution is different for each employee. Date End: This field is left blank until you are aware of the date that the date the benefit plan type will end (cease to exist). Once the date is entered here, the employee will no longer be on the plan and deductions will stop generating for them in the payroll. It should also be noted that when an employee is separated, if the flag titled Stop Benefits is set to YES, then the end date will be automatically populated with the separation date of the employee. This is another integrated feature of HRplus where data only has to be entered in one module but can be linked to connected modules. Sum Insured: If this is a non-life insurance policy with a sum insured, then enter the value of the reimbursement here. Save and repeat the process to link a plan to the employee. Note: Users have the ability to enroll an employee in a benefit plan on two (2) different dates. |
Step 4: View Saved record of Enrolled Employee
How to setup the Benefits Enrollment Rules
|
|
Benefits>>Benefits Plan Types>>Expand Benefit Plan Type Record>>Benefit Enrollment Rules OR Payroll>>Business Rules>>Benefits>>Benefits Plan Types>>Expand Benefit Plan Type Record>>Benefit Enrollment Rules |
Benefit Enrollment Rules
This is where rules can be defined for employees to join the requisite Benefit plan Type.
Select New Record for Rules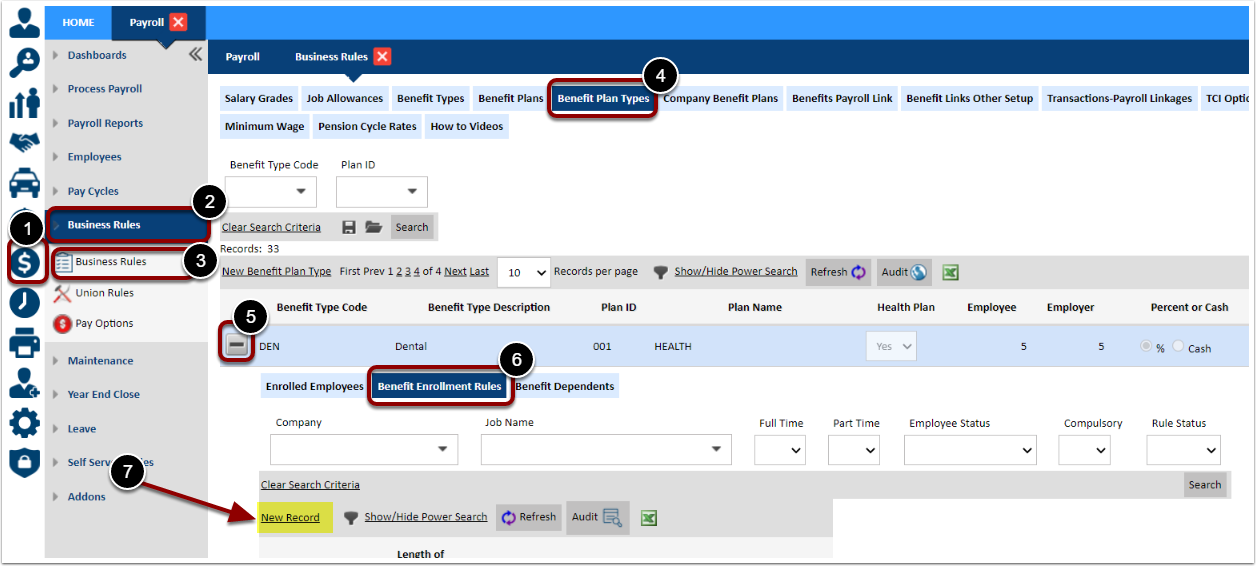
Enter Benefit Enrollment Rules Details
|
• Benefit Plan Type: All data in this box is auto populated and greyed out i.e. cannot be edited • Company Code: Select accordingly • Job Code: Select the code of the job for which you would like to build the rule • Length of Service Required: Enter the number according to the company’s business rules • Period: Flag if the number entered in the Length of Service Required field represents, Days, Months or Years • Full Time & Part Time: Flag if the rule is applicable to Full Time as well as Part Time employees. • Employee Status: Flag the employee status required for the rule to be applicable. • Rule: Compulsory: Flag according to the company’s business rules. • Rules: Status: Flag as active for the rule to become effective in the application. Save the record. |
How do I setup the Benefits Dependent Rules?
|
|
Navigation: Benefits >> Benefits Plan Types >> Expand Benefit Plan Type Record >> Benefit Dependents OR Payroll >> Business Rules >> Benefits >> Benefits Plan Types >> Expand Benefit Plan Type Record >> Benefit Dependents |
Benefit Enrollment Rules
This is where rules can be defined for employees to join the requisite Benefit plan Type.
This is an alternative setup option to the Benefit Payroll rules.
Select New Record for Rules
Enter Benefit Dependent Details
|
• Job Code: Select whether the rule applies to all jobs or a selected job. • Payroll Code Type: Select the payroll items (Earnings or Allowances) on which the benefit is calculated. • Payroll Code: Select the earning code or allowance code that the benefit will be generated under when the payroll is processed. • Hours or Dollar: Select if they earning or allowance code is entered in hours or as a dollar amount • Factor: Enter the factor by which the dependent payroll entry will be multiplied. • Limit: Enter the limit of the dependent value (usually a large value). • Use Fixed Hours: If the benefit is based on a fixed amount check the Use Fixed Hours box and enter the value in Fixed Hours field. Save the record. |
How to set up Benefit-Payroll Link
|
|
Benefits>>Benefit Setup>>Benefits-Payroll Link OR Payroll>>Business
Rules>>Business Rules>>Benefit Payroll Link |
Benefits-Payroll Link
The Benefits-payroll link is normally configured during the project phase with HRplus and with the assistance of an Implementation Specialist.
Via this option;
1. A benefit plan/plan type can be linked with a deduction code for a particular pay group. Instead of entering a cycle change record for each employee, the deduction will be processed for all employees in the pay group when the payroll is run. The employees must be registered for the plan/plan type for the deductions to be made.
2. A deduction can be automatically set up for employees registered in benefit plans. The system will use the data set up here to automatically generate a deduction for the specified benefit plan/plan type in the correct cycle.
|
|
How does it work? The system will check to determine if the employee is registered in a benefit plan and will use the Effective Date to determine the pay cycle. The Terminated Date will be used to stop processing the deduction. Employees must be on the plan for the deductions to be made via the link. Further, the Effective Date must be on or before the pay period end date (Payroll>>Pay Cycles) and the Termination Date, if any, must be on or after the pay period start date (Payroll>>Pay Cycles). The rule can be
overridden by entering a cycle change for the deduction code in the link. For
employees not on the plan, cycle changes have to be entered every cycle for
the deduction to be processed whether the deduction is flagged as regular or
not. If a benefit–payroll link is removed the deduction code is automatically flagged as not regular. Once a Benefit Payroll Link is created the deductions will be made whether the deduction is flagged as regular (or not for employees in the plan within valid effective and termination dates. The setup is done by Pay Group and Deduction Codes for each Benefit Type must already be set up (Maintenance>> Payroll Setup>> Deductions).
|
Paygroup Setup for Benefit Plan Type
This code should also be entered in the Business Rule Employee Override window: • Go to Payroll >. Business Rules >> Pay Options >> Employee Business Rule Override. • Enter the Business rule code and description. • Click on the + sign to expand the record and select the employee to whom the override applies. |
Employee Contribution
|
EMPLOYEE Employee % or $: 1. % for Pay Group: Select if ALL employees in the pay group/plan contribute the same percentage. 2. Amount for Pay Group: Select if ALL employees in the pay group/plan have the same contribution. 3. % In Benefits: Select if employees in the pay group/plan have do not have the same percentage contributions. If this option is selected, the system will use the figures in Employee and Employer Contribution fields in the Enrolled Employee window of the Benefits Module (Benefits >> Benefit Plan Type>> Enrolled Employee >> Expand record to see individual employee contributions.) 4. Amount in Benefits: Select if employees in the pay group/plan do not contribute the same cash amount. If this option is selected, the system will use the figures in Employee and Employer Contribution fields in the Enrolled Employee window of the Benefits Module. (Benefits >> Benefit Plan Type>> Enrolled Employee >> Expand record to see individual employee contributions.) If you select either % for Pay Group or Amount for Pay Group ( 1 or 2 above) then enter a value in the Employee Contribution field. The value will be interpreted as an amount or percent depending on the value in the Employee % or $ field. If you select either % in Benefits or Amount in Benefits (3 or 4 above) then do not enter a value in the Employee contribution field. Instead, the system will use the values entered when you enroll the employees into Benefit Type Plans via (Benefits>> Benefit Setup>> Benefit Plan Type). The value will be interpreted as an amount or percent depending on the value in the Employee % or $ field. If the value of Employee % or $ is either an Amount for Pay group or Amount in Benefits ( 2 or 4 above), then select NOT USED in the Employee Calc On field. If the value of Employee % or $ is either % for Pay Group or % in Benefits ( 1 or 3 above), then identify what the value is to be calculated on by making a selection from the above options in the Employee Calc On field. If Other is selected, then identify the payroll codes on the values calculated via the Benefit Link Other Setup . Select the pay group, benefit plan, plan type, deduction for which the link is to be created. Then select the code type ( Timesheet, Allowances, Deductions, Other Income, Pay profile) and the particular code associated with your selection. A calculation for the benefit can be derived using the Multiple of Others feature. The default is 1.0.
|
Employee Calc On
|
EMPLOYEE Employee Calc On: Select from the following options which will indicate the earnings on which the employee benefit contributions are to be calculated when the payroll is run: Basic + Straight: This selection will allow for the employee benefit deduction to be calculated ONLY on employee earnings flagged as Basic OR Straight in the Earnings Type setup. Earnings so flagged will be summed and the percentage calculated on the total. Basic Only: Calculations and deductions will be based on ONLY the employee’s pay flagged as Basic in the Earning Type setup screen. Straight Only: Calculations and deductions will be based on ONLY the employee’s pay flagged as Straight in the Earning Type setup screen. All Timesheet Earnings: Calculations and deductions will be based on ALL the employee’s time sheet earnings Total Gross: Calculations and
deductions will be based on the employee’s TOTAL gross pay. Gross Taxable: Calculations and deductions will be based on the employee’s total gross pay AFTER tax. Other: If the deduction is to be calculated on any other income type that is not included in this list, select this option. Then, use the Benefit Links Other Setup to define the income that the benefit calculation is to be based (illustrated in the Benefits Links Other Setup section of this manual). Not Used: Select this option if the Employee % or $ is either Amount for Pay Group or Amount in Benefits as no calculation is required to determine the employee’s benefit deduction. Employee Calc On Factor: In this field, enter a factor (number) by which the value in Employee Calc on is to be multiplied according to the rules of your Benefit Plan. If there is no factor, then you can simply enter ‘1’.
|
|
Employee Round Rules: Selections include Do Not Round, To the next, To the Lower or To the Nearest. Use this to indicate to the application, the manner in which the product of the Employee Calc On x the Employee Calc On Factor is to be rounded. If it is to be rounded, in the Employee Round to Nearest field, enter the dollar amount by which the product should be rounded. The default option is set to round to 0.01. Rounding to the nearest 0.01 means you basically round down if the thousandth place (3rd digit right of the decimal) is less than 5 and if it's 5 and up, then round up. So 0.163 rounds down to 0.16 since the hundredth is 3, and 0.1432 rounds down to 0.14 as well. If it was 0.1482, for example, you'd round
up to 0.15. |
Employer Contribution
Contribution fields
in the Enrolled Employee window of
the Benefits Module (Benefits >> Benefit Plan Type>> Enrolled Employee >> Expand record to see individual employee contributions.) 4. Amount in Benefits: Select if the employer contribution for ALL employees in the pay group is NOT the same cash amount. If this option is selected, the system will use the figures in Employee and Employer Contribution fields in the Enrolled Employee window of the Benefits Module. (Benefits >> Benefit Plan Type>> Enrolled Employee >> Expand record to see individual employee contributions.) If you select either % for Pay Group or Amount for Pay Group ( 1 or 2 above) then enter a value in the Employer Contribution field. The value will be interpreted as an amount or percent depending on the value in the Employer % or $ field. If you select either % in Benefits or Amount in Benefits (3 or 4 above) then do not enter a value in the Employer contribution field. Instead, the system will use the values entered when you enroll the employees into Benefit Type Plans via (Benefits>> Benefit Setup>> Benefit Plan Type). The value will be interpreted as an amount or percent depending on the value in the Employer % or $ field. If the value of Employer % or $ is either an Amount for Pay group or Amount in Benefits ( 2 or 4 above), then select NOT USED in the Employer Calc On field. If the value of Employer % or $ is either % for Pay Group or % in Benefits ( 1 or 3 above), then identify what the value is to be calculated on by making a selection from the above options in the Employer Calc On field. If Other is selected, then identify the payroll codes on the values calculated via the Benefit Link Other Setup . Select the pay group, benefit plan, plan type, deduction for which the link is to be created. Then select the code type ( Timesheet, Allowances, Deductions, Other Income, Pay profile) and the particular code associated with your selection. A calculation for the benefit can be derived using the Multiple of Others feature. The default is 1.0.
|
Employer Calc On
|
Employer Calc On: Select from the following options which will indicate the earnings on which the employee benefit contributions are to be calculated when the payroll is run: Basic + Straight: This selection will allow for the employee benefit deduction to be calculated ONLY on employee earnings flagged as Basic OR Straight in the Earnings Type setup. Earnings so flagged will be summed and the percentage calculated on the total. Basic Only: Calculations and deductions will be based on ONLY the employee’s pay flagged as Basic in the Earning Type setup screen. Straight Only: Calculations and deductions will be based on ONLY the employee’s pay flagged as Straight in the Earning Type setup screen. All Time sheet Earnings: Calculations and deductions will be based on ALL the employee’s time sheet earnings |
|
Total Gross: Calculations and deductions will be based on the employee’s TOTAL gross pay. Gross Taxable: Calculations and deductions will be based on the employee’s total gross pay AFTER tax. Quoted Pay Rate: Calculations and deductions will be based on employee’s pay rate as defined in the Cycle Rate $ field in the Employee Pay Profile window (Payroll>>Employees>> Pay Profile). Employer Amount x (Employee-Employer) Factor: The employer’s contributions can also be calculated on a factor based on the employees’ contributions. Other: If the deduction is to be calculated on any other income type that is not included in this list, select this option. Then, use the Benefit Links Other Setup to define the income that the benefit calculation is to be based (illustrated in the Benefits Links Other Setup section of this manual). Not Used: Select this option if the Employee % or $ is either Amount for Pay Group or Amount in Benefits as no calculation is required to determine the employee’s benefit deduction. Employer Calc On Factor: In this field, enter a factor (number) by which the value in Employer Calc on is to be multiplied according to the rules of your Benefit Plan. If there is no factor, then you can simply enter ‘1’. Employer Round Rules: Selections include Do Not Round, To the next, To the Lower or To the Nearest. Use this to indicate to the application, the manner in which the product of the Employee Calc On x the Employee Calc On Factor is to be rounded. If it is to be rounded, in the Employer Round to Nearest field, enter the dollar amount by which the product should be rounded. |
|
Employee Employer Factor: If the highlighted option above is selected for the EMPLOYER deduction, then enter a value in this field. The value of the Employee deduction will be multiplied by this factor entered here to determine the value of the Employer deduction. Run In: This field indicates whether the deductions for the plans are to be made in: Normal: The default is set for the deductions to run in Normal pay cycles. This can be changed to any of the other options including Out of Cycle, Normal and OOC, No Cycle. If no cycle is selected, then the benefit deduction will not run in the payroll until this has been changed. Start in Cycle: This indicates to the application the cycle in which the benefit contribution calculations and deductions are to begin. E.g. 2. If 2 is entered here, then the deductions are to begin in cycle 2. Number of Cycles to Skip: This indicates to the application if the calculations and deductions of the benefit contributions are to skip any cycles. |
|
The two fields Start In Cycle and Num Cycles To Skip work together to control the PAYCYCLES in which the deductions are made. Examples follow: Start In Cycle: Contains a pay cycle and is a positive integer. Num Cycles To Skip: Contains a positive integer. • If the value in the Starting Pay Cycle field is 1 and the value in the Num Cycles To Skip is 1, then the link is applied in cycle 1 initially and then in pay cycle 2,3, 4, ... (the link is applied in every pay cycle). • If the value in the Starting Pay Cycle field is 2 and the value in the Num Cycles To Skip is 2, then the link is applied in cycle 2 initially and then in pay cycle 4,6, 8, ... (the link is applied in even pay cycles.) • If the value in the Starting Pay Cycle field is 3 and the value in the Num Cycles To Skip is 4, then the link is applied in cycle 3 initially and then in pay cycle 7,11, 15. The general formula for determining how the set up is applied in a pay cycle is: Modulus (a – b, c) = 0, where a is the pay cycle that is being run, b is the value in the field Starting Cycle, and c is the value in the field Num Cycle To Skip. This means that if the remainder when (a-b) is divided by c is equal to zero, the link is applied. |
How to use the Benefit Link Other Setup function
|
|
Benefits>>Benefits>>Benefits Setup>>Benefits Link Other Setup OR Payroll>>Business Rules>>Business Rules>>Benefits Link Other Setup |
Benefits Link Other Setup
This option is ONLY used for linking benefits where in the Benefits Payroll Link screen, the Employee Calc On = OTHER OR the Employer Calc On = OTHER.
The payroll codes on which the benefits are to be calculated are identified via this option.
Enter New Benefits Other Link
Enter the Details of the Calculation of the
Benefit
|
Pay Group: Select the pay group from the available options in the drop-down list. Benefit Plan: Select the Benefit Plan from the drop down list. Benefit Type: Select the Benefit Type from the drop-down list. Deduction: Select the deduction code under which the benefit will be deducted. Code Type: Select one of the options: 1. TIME SHEETS 2. ALLOWANCES 3. DEDUCTIONS 4. OTHER INCOME |
|
5. PAY PROFILE Payroll Code: Select from the list of Time sheets, Allowances, Deductions, Other Income or Pay Profile. The respective list will be displayed depending on the selection (e.g. if the Allowances option is selected then the list of allowance types will be displayed for selection of the Payroll Code). Please note that the Payroll Code is the Time sheet, Allowance, Deduction, Other Income Code or for Pay Profile – the cycle salary or hourly rate. Factor: Enter the factor to be used e.g. 2, 3.5, 5 etc. The payroll will use this factor to process the deduction (e.g. if the factor is 2 and the Payroll Code is Hourly Rate, then the deduction will be calculated as twice the employee’s hourly rate) |
How to add/enroll an employee in a plan?
|
|
Business Rules>>Business Rules>>Benefit Plan Types |
|
There are two locations where employees can be enrolled in their benefit plans on HRPlus. 1. Via Benefits Plan Types 2. Via Coverage N.B. Employees can be registered for any number of plans. NB however, the employee can be linked to only ONE Primary Health Plan and ONE Secondary Health plan. |
|
Step 1: Navigate to the Benefit Plan Type screen
Step 2: Enter the Employee Enrollment details
|
Fill the details as follows: Company Code: Select the company the employee belongs to Pay Group: Select the pay group the employee belongs to First Name: Select employee's first or last name Date Join: the date the employee joined the benefit plan (e.g. the date on the employee’s registration form) Date Start: the effective date the employee became active on the plan. Certificate Number: the registration number of the employee that is obtained from the insurance company. Option: Cannot be edited but is based on the Benefit Plan Type record Employee Contribution: the dollar value or percentage of the employee’s contribution to the plan. Employer
Contribution: the dollar value or percentage of the employer’s contribution
to the plan. Date End: the date the benefit plan
type will end (cease to exist). This is auto-populated by the application when
the employee is separated and the benefits plan is stopped. This field can be
left blank until an end date is determined Sum Insured: the sum insured obtained
from the insurance company. Click on the diskette to save the record and repeat to |
When configuring the Benefits-Payroll link, if Amount in Benefit or % in Benefit is selected, when the payroll is run the entries made in the Employee/Employer Contribution will be used by the application to determine the contributions being made by the employee and employer. Step 3: View Enrolled
Employee Details - Benefits Module View Step 4: (Optional) View Enrolled Employee Details - Employee Profile View |
|
|
Benefits>>Coverage |
Coverage
Coverage allows you to see the plans that the employee is covered under and also is another way in which an employee can be enrolled in a plan.
N.B. Employees can be registered for any number of plans however, the employee can be linked to only ONE Primary Health Plan and ONE Secondary Health plan.
Add Plan to Employee Record
N.B. The Benefit Plan Type MUST be linked to the Company BEFORE employees can be successfully enrolled in the plan.
|
EMPLOYEES • Search for the employee • Click on the plus sign to expand the record • Click on the New Record • Select the Plan ID from the drop down box. All other fields on the left hand side will be filled out when the details of the plan is selected. Date Joined : The date the employee joined the benefit plan (e.g. the date on the employee’s registration form) Date Started : The effective date the employee became active on the plan. Certificate Number : The registration number of the employee that is obtained from the insurance company. Employee Contribution : Enter the value of the employee’s contribution to the plan. This can be either cash or a percentage based on what was set up at the plan level. Employer Contribution - Enter the value of the employer’s contribution to the plan. This can be either cash or a percentage based on what was set up at the plan level. Date End: This field is left blank until you are aware of the date that the date the benefit plan type will end (cease to exist). Once the date is entered here, the employee will no longer be on the plan and deductions will stop generating for them in the payroll. It should also be noted that when an employee is separated, if the flag titled Stop Benefits is set to YES, then the end date will be automatically populated with the separation date of the employee. This is another integrated feature of HRplus where data only has to be entered in one module but can be linked to connected modules. Sum Insured – the sum insured obtained from the insurance company. Save and repeat the process to link a plan to the employee. |
View Ex Employee Plan Details
The 'Ex-Employees' tab shows you the same information but will only list the employees who have been separated from the company.
How to add a Beneficiary to an employee's plan?
|
|
Benefits>>Beneficiaries |
|
Beneficiaries A beneficiary is the person or entity that you legally designate to receive the benefits from your financial products. For life insurance coverage, that is the death benefit your policy will pay if you die. For retirement or investment accounts, that is the balance of your assets in those accounts. Although the Benefits module is embedded in the POWERpay module, there are additional screens that distinguishes the difference between the two modules. One such function is the ability to record beneficiaries to a plan. |
|
Enter Beneficiary for Employee
|
• First we enter the details of the Beneficiary. Here we enter the: Click on New Record Ben Id - a user defined code used to identify the beneficiary. Each beneficiary must have their own ID. The application will indicate the last ID used in this screen. Beneficiary - enter the beneficiary's full name Enter the Address details in the Ben Address Line 1, Ben Address Line 2 and Ben Address Line 2 fields Relationship - enter the relationship this beneficiary to the employee (Son, Spouse, Daughter, etc Save the record and repeat the process to add as many beneficiaries as required. Please note this is for record keeping purposes ONLY! |
Enter Registered Beneficiary for Employee
|
Next we link the beneficiary to the plan in the Registered Beneficiaries tab. Here you: Click on a New Record Beneficiary ID: The employee's beneficiary must be listed in the Beneficiary tab in order to be available for selection as a Registered Beneficiary Plan ID - Select the name of the plan the beneficiary will be linked to Plan Type Code (this is be based on the Plan ID selected above) Health Plan - will be flagged NO if the plan selected above is Not a health plan Effective Date - the date from which this beneficiary has been registered with the insurance provider as a beneficiary Percentage % - The percentage of the policy payout (in the event of death) that the beneficiary is entitled to from the total value of the plan. For example if this is the sole beneficiary then they will receive 100% of the value of the plan. Note that an employee may have multiple registered beneficiaries for a plan. Save the record and repeat the process to add additional beneficiaries to the plan if required. |
Benefits FAQs
What are the key functionalities of the HRplus
Benefits Module?
The Benefits Module offers several key functionalities:
• Benefits Enrollment: Employees can easily view, compare, and enroll in different benefit plans offered by the organization.
• Benefits Administration: The module automates administrative tasks such as eligibility tracking, enrollment status updates, and benefits plan documentation.
• Benefit Plan Configuration: HR administrators can configure and customize benefit plans within the application according to the organization's offerings.
• Employee Self-Service: Employees can access their benefits information, review plan details, view coverage summaries, and access relevant documents online.
• Reporting:
The module generates reports to provide insights into benefits participation,
costs, and trends.
How do I set up a new benefit type in HRplus?
To set up a new benefit type:
1. Navigate to Benefits>>Benefit Setup>>Benefit Types.
2. Enter a unique Benefit Type Code and a clear Benefit Type Description (e.g., "Dental").
3. Save the record and repeat the
process for additional benefit types.
What are Benefit Enrollment Rules and how do I set them up?
Benefit Enrollment Rules define the eligibility criteria and process for employees to join specific benefit plan types.
To set up these rules:
1. Go to Benefits >> Benefits Plan Types >> Expand the desired Benefit Plan Type Record >> Benefit Enrollment Rules.
2. Click "New Record" and define the rule criteria, including:
• Company Code
• Job Code
• Length of Service Required
• Period (Days, Months, Years)
• Full Time & Part Time applicability
• Employee Status
• Rule Compulsion (Compulsory or Optional)
• Rule Status (Active or Inactive)
3. Save the record.
How do I enroll an employee in a benefit plan?
You can enroll employees in two ways:
Method 1: Via Benefits Plan Types
1. Go to Benefits >> Benefits Setup >> Benefit Plan Types.
2. Expand the desired benefit plan record.
3. Click "New Record" under "Enrolled Employees."
4. Enter the employee details, including Date Join, Date Start, Certificate Number, and contributions.
5. Save the record.
Method 2: Via Coverage
1. Navigate to Benefits>>Coverage.
2. Search for the employee and expand their record.
3. Click "New Record."
4. Select the Plan ID. The remaining details will auto-populate.
5. Fill in the employee's Date Joined, Date Started, Certificate Number, and contributions.
6. Save the record.
What is the Benefits-Payroll Link and how do I set it up?
The Benefits-Payroll Link connects benefit deductions and contributions with the HRplus payroll module. It automates the deduction process for employees enrolled in benefit plans.
To set it up:
1. Go to Benefits>>Benefit Setup>>Benefits-Payroll Link.
2. Select the Pay Group, Benefit Plan, and Benefit Type.
3. Choose the Deduction Code and Employer Override Code.
4. Define Employee and Employer contribution settings.
5. Configure the calculation basis for contributions (e.g., Basic + Straight, Total Gross).
6. Set the rounding rules for contributions.
7. Define the cycle for running the
deductions (e.g., Normal, Out of Cycle).
How do I add a beneficiary to an employee's benefit plan?
To add a beneficiary:
1. Go to Benefits>>Beneficiaries.
2. Enter the beneficiary's details, including their relationship to the employee.
3. Go to the "Registered Beneficiaries" tab.
4. Link the beneficiary to the relevant plan by selecting the Plan ID and Plan Type Code.
5. Specify the Effective Date and the percentage of the benefit payout they are entitled to.
Related Articles
Benefits (Set Up Benefits)
Set Up Benefits Benefits>>Benefit Setup>>Benefit Types OR Payroll >>Business Rules >>Business Rules>>Benefit Types How to enter a Benefit Type Benefit Type A Benefit Type categories the benefit plans that an organization makes available to their ...Benefits (Employee Benefits Transactions)
Employee Benefits Transactions Business Rules>>Business Rules>>Benefit Plan Types How to add/enroll an employee in a plan? There are two locations where employees can be enrolled in their benefit plans on HRPlus. Via Benefits Plan Types Via ...Benefits (FAQs)
Benefits FAQs What are the key functionalities of the HRplus Benefits Module? The Benefits Module offers several key functionalities: Benefits Enrollment: Employees can easily view, compare, and enroll in different benefit plans offered by the ...Employee Self Service (My Benefits)
My Benefits HOME>>My Benefits>>My Leave>>Entitlements Leave: How to View my Leave Entitlements Leave Entitlements Employees can easily check their available leave balance via the Employee Self-Service (ESS) module without needing to contact HR. ...Benefits (Introduction and Key Concepts, Glossary and Module Updates)
Introduction and Key Concepts Overview of the Benefits Module OVERVIEW The HRplus Benefits Module is designed to streamline the management of employee benefits programs within an organization. It allows employees to easily view, their enrollment in ...